
4 Ways to Clear the TPM on Windows 11 – Protecting Your PC In the digital age, safeguarding your PC against malware and ensuring data privacy has never been more critical. The Trusted Platform Module (TPM) plays a pivotal role in this endeavor, acting as a stalwart defender against various cyber threats. In this guide,
4 Ways to Clear the TPM on Windows 11 – Protecting Your PC
In the digital age, safeguarding your PC against malware and ensuring data privacy has never been more critical. The Trusted Platform Module (TPM) plays a pivotal role in this endeavor, acting as a stalwart defender against various cyber threats. In this guide, we’ll explore four effective methods to clear the TPM on Windows 11, ensuring your computer stays secure and your data remains protected.
When Should You Clear TPM, and Is It Safe to Do So?
While the Trusted Platform Module diligently safeguards sensitive data and thwarts hacking attempts rooted in your computer’s hardware, there are several scenarios when clearing the TPM becomes necessary:
1. Removing Malware
If you suspect your computer has fallen victim to malware, resetting the TPM is a potent measure to eliminate any lingering threats. This action ensures that any malware that may have infiltrated your system is effectively eradicated.
2. Preparing to Sell Your Computer
When you plan to part ways with your trusted PC, it’s crucial to reset the TPM. This step guarantees the protection of your privacy by erasing critical information about drivers and applications, safeguarding your data from potential misuse.
3. Troubleshooting Security Issues
Clearing the TPM can be instrumental in addressing security-related problems, encryption issues, or authentication challenges that may arise on your PC.
4. Clean OS Installation
Before embarking on a clean installation of a new operating system, it’s advisable to clear the TPM. This ensures that the OS can fully harness TPM-based functionalities like attestation, enhancing security.
Rest assured, clearing the TPM is a safe operation. However, it’s crucial to note that this action will wipe all encrypted keys generated by the TPM and their associated protected data. This data includes information related to virtual smart cards or sign-in PINs. To prevent data loss, it’s prudent to back up your Windows data protected by the TPM before proceeding.
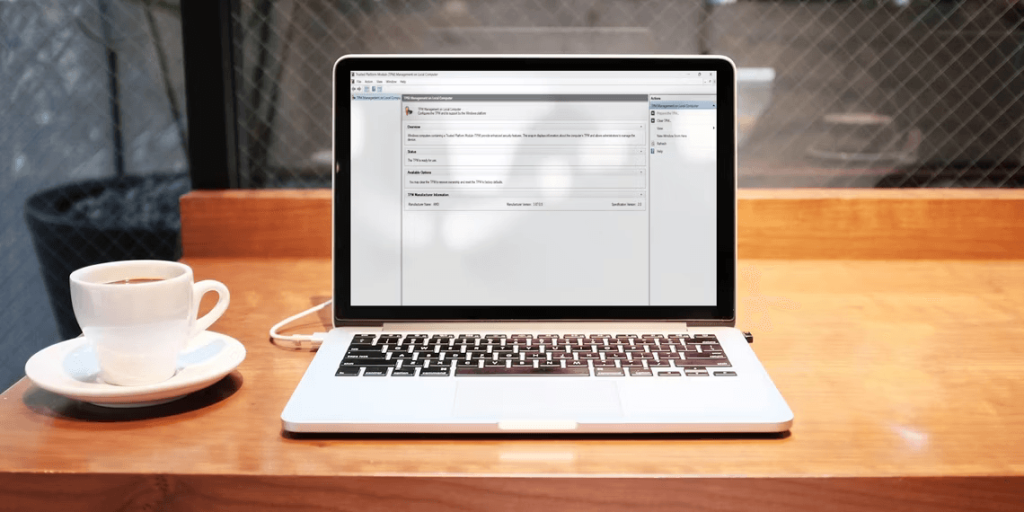
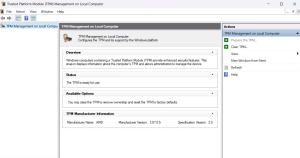
1. How to Clear the TPM Using the TPM Management Console
The TPM management console empowers you to manage the TPM installed on your computer efficiently. Here’s how to clear or reset TPM using this tool:
- Press Win + R keys simultaneously to open the Run dialog box.
- Type tpm.msc in the search bar and press Enter.
- Click the Clear TPM option in the Actions section.

Image by https://www.makeuseof.com/
- Your computer will restart to complete the TPM reset process.

Image by https://www.makeuseof.com/
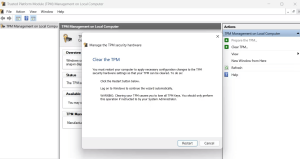
2. How to Clear the TPM Using the Windows Security App
The Windows Security app provides another avenue for clearing the TPM. Follow these steps:
- Open the Start Menu, type Windows Security in the search bar, and press Enter.
- Choose Device security from the left sidebar and click on Security processor details.

Image by https://www.makeuseof.com/
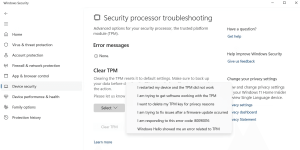
- Click on Security processor troubleshooting.

Image by https://www.makeuseof.com/
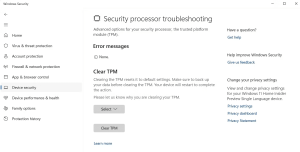
- Select a reason to delete TPM from the Select drop-down menu.

Image by https://www.makeuseof.com/
- Click on Clear TPM.

Image by https://www.makeuseof.com/
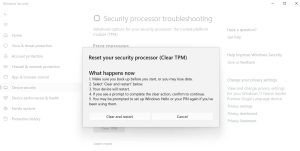
- Click on Clear and restart.

Image by https://www.makeuseof.com/

3. How to Clear TPM Using Windows PowerShell
For those comfortable with command-line operations, Windows PowerShell offers a streamlined method:
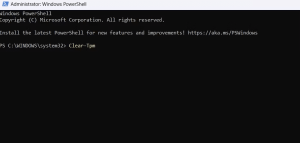
- Open Windows PowerShell with administrative rights.
- Type Clear-Tpm and press Enter.

Image by https://www.makeuseof.com/
4. How to Clear the TPM Through the BIOS
Configure your computer’s security layers, including the TPM, directly from the BIOS:
- Restart your computer and press the BIOS key (usually F2 or Del) to access the BIOS menu.
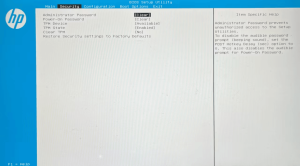
- Switch to the Security tab.

Image by https://www.makeuseof.com/
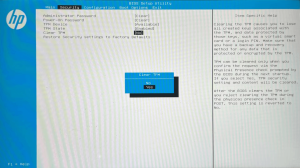
- Click the Clear TPM option and choose Yes from the prompt.

Image by https://www.makeuseof.com/
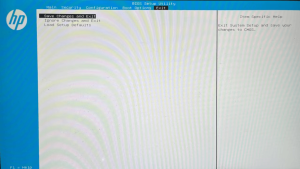
- Switch to the Exit tab and select Save Changes and Exit, then choose Yes.

Image by https://www.makeuseof.com/
Your computer will restart, and you’ll be prompted to set up your PIN on the login screen, signifying the successful clearing of the TPM.
Table: Methods to Clear TPM on Windows 11
| Method | How to Access |
|---|---|
| TPM Management Console | Win + R > tpm.msc > Clear TPM |
| Windows Security App | Start Menu > Windows Security > Clear TPM |
| Windows PowerShell | Admin PowerShell > Clear-Tpm |
| BIOS | Restart > BIOS (F2/Del) > Clear TPM > Save Exit |
Ensuring the security of your PC is paramount in today’s interconnected world. By mastering these four methods to clear the TPM on Windows 11, you’re taking a proactive step in safeguarding your digital realm against potential threats. Remember, a secure PC is a resilient PC.


Leave a Comment
Your email address will not be published. Required fields are marked with *