Introduction: When using your Mac, you might need to adjust network service settings to ensure a smooth and reliable internet connection. Whether you received specific settings from your Internet Service Provider (ISP) or network administrator, this guide will walk you through the process of making those changes effortlessly. Accessing Network Service Settings on Mac: To
Introduction:
When using your Mac, you might need to adjust network service settings to ensure a smooth and reliable internet connection. Whether you received specific settings from your Internet Service Provider (ISP) or network administrator, this guide will walk you through the process of making those changes effortlessly.
Accessing Network Service Settings on Mac:
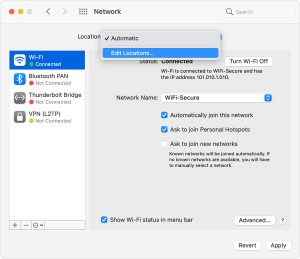
To begin, navigate to the Network settings on your Mac by following these steps:
- Click on the Apple menu located in the top-left corner of your screen.
- From the drop-down menu, select “System Preferences.”
- In the System Preferences window, click on “Network” in the sidebar. (You may need to scroll down to find it.)
-
image by:https://support.apple.com/
Modifying Network Service Settings:
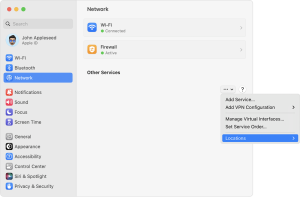
Once you have accessed the Network settings, you can proceed with adjusting the specific network service settings:
- On the right side of the Network window, you will see a list of available services, such as Ethernet or Wi-Fi.
- If you don’t find the service you are looking for, refer to the “Set up a network service” section to add it.
Option A: Configuring Ethernet Settings:
If you wish to modify the Ethernet settings, follow these steps:
- Click on the “Ethernet” option from the list of services on the right.
- Next, click on the “Advanced” button located in the lower-right corner.
- In the Ethernet tab, you can adjust various settings, including Configure IPv4/IPv6, MTU, and more.
- After making the necessary changes, click “OK” to save the settings.
Option B: Adjusting Wi-Fi Settings:
To make changes to your Wi-Fi settings, proceed as follows:
- Click on the “Wi-Fi” option in the list of services on the right.
- Then, click on the “Advanced” button, just like with Ethernet.
- Within the Wi-Fi tab, you can modify settings such as preferred networks, DNS, and more.
- Save your changes by clicking “OK.”

image by:https://support.apple.com/
Finalizing Changes:
After you have made the required adjustments, it’s crucial to finalize the process correctly:
- Close the Network window by clicking the red “X” button in the top-left corner.
- Your changes will take effect immediately, and your Mac should now be using the updated network service settings.
Remember, if you ever encounter network-related issues after modifying the settings, you can always revert to the default configuration or consult your ISP or network administrator for assistance.
Conclusion
Managing network service settings on your Mac is a straightforward process. By accessing the Network settings through System Preferences, you can easily adjust Ethernet or Wi-Fi settings to align with the specifications provided by your ISP or network administrator. With these steps, you can ensure a seamless and optimized internet connection on your Mac.


Leave a Comment
Your email address will not be published. Required fields are marked with *