

An Overview of Mac’s Parental Controls Macs offer an excellent platform for kids to explore the internet and dive into the world of technology. Despite this easy access, the necessity arises to safeguard them against unsuitable material. Thankfully, macOS includes built-in parental controls that empower you to control the content your child can access
An Overview of Mac’s Parental Controls
Macs offer an excellent platform for kids to explore the internet and dive into the world of technology. Despite this easy access, the necessity arises to safeguard them against unsuitable material. Thankfully, macOS includes built-in parental controls that empower you to control the content your child can access and monitor their screen time.
Set Up a Child Account on an Apple computer
To begin, you should make an individual account for your child. You can maintain uninterrupted browsing and app usage by implementing these restrictions. The process may vary depending on the macOS version you are using:
macOS Catalina and later: Access System Preferences > User Management.
Click on the lock to make changes, Provide your password as instructed.
Press the ‘+’ symbol to create a new account.
Provide an account name and password, and choose “Standard” as the account type.
Click on “Create User.”
macOS Mojave or earlier:
Go to System Preferences > Parental Controls.
Follow the same process as detailed previously to establish an account specifically for children.
An efficient method for protecting your child and controlling preferences on Apple devices is through Family Sharing. Each family member needs to have their Apple ID to maintain efficient performance of Family Sharing.
To set up Family Sharing:
Launch System Preferences then go to Family Sharing.
Press on the addition symbol (‘+’) that can be found beneath the Family category. below the Family section.
Create a child account by following the on-screen instructions.
Provide parental consent, containing the security pin pertaining to the connected payment method.
Give consent to the terms and conditions, and enable “Ask to Buy” for regulating their acquisitions.
Set Up Parental Controls (Using Family Sharing)
If you’ve set up Family Sharing, you can set up parental controls easily:
Verify you are logged into your Apple identification.
Launch System Preferences > Screen Time.
Click on “Options” and select “Share across devices” for effectively managing preferences across multiple devices.
Pick the child’s account from the options provided.
Click “Turn On” to enable Screen Time and manage other options.
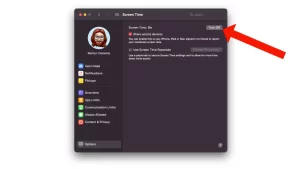
Image by:https://www.macworld.com/
Set Up Parental Controls (Without Family Sharing)
If you prefer not to use Family Sharing, follow these steps to set up parental controls:
Enter your child’s Mac user account.
For those who have macOS Catalina or later installed, go to System Preferences > Screen Time.
Enable Screen Time and configure options such as Downtime and App Limits.
If using macOS Mojave or earlier, navigate to System Preferences and access Parental Controls, then modify the settings accordingly
Now that you have the basic parental controls set up, it’s time to tailor them to suit your requirements:
Downtime: Establish precise intervals when the Mac is unavailable for use. Access the Screen Time > Downtime section to modify this feature. for adjusting this feature.
App Limits: Control the amount of time your child spends on specific apps or app categories. Navigate to Screen Time > App Limits to adjust these settings.
Communication Limits: Determine who your child can communicate with during Screen Time hours. To control this feature, go to the Communication Limits option within the Screen Time settings.
Always Allowed: Enable unrestricted usage of specific apps with these methods: to Screen Time > Always Allowed.
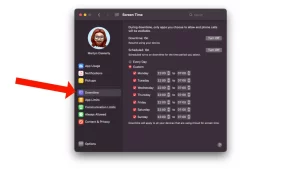
Image by:https://www.macworld.com/
Set Up Website Restrictions and Bans
The Content & Privacy section allows you to decide the type of content your child can access:
Enable Content & Privacy by entering the passcode.
Pick the desired limitations, such as Block inappropriate websites or Only allow access to permitted websites.
Modify website browsing by adding child-friendly sites.
Most popular Parental Control Apps designed specifically for Mac Users
If you need additional features and cross-platform support, consider these third-party parental control apps:
Qustodio: Offers comprehensive features and works on iOS, macOS, Windows, Android, and Amazon Kindle devices.
Net Nanny: Provides screen time limits, content filtering, and real-time monitoring across various devices.
FamiSafe: Offers web filtering, location tracking, screen time limits, and more across multiple platforms.
By utilizing either the native capabilities of macOS or third-party applications, you can effectively protect your child by implementing parental controls, your child’s safety can be guaranteed. An alternative is to establish a protected online setting for them. However, remember to stay vigilant and educate your child about online risks and responsible device usage.


Leave a Comment
Your email address will not be published. Required fields are marked with *