
A beginner’s guide to sharing internet connection on Mac Sharing your Mac’s internet,When you activate this setting, it enables you to distribute and utilize the internet from your Mac to various devices connected to the same local network connection with other devices on your local network can prove to be exceptionally advantageous. Regardless if
A beginner’s guide to sharing internet connection on Mac
Sharing your Mac’s internet,When you activate this setting, it enables you to distribute and utilize the internet from your Mac to various devices connected to the same local network connection with other devices on your local network can prove to be exceptionally advantageous. Regardless if your internet connection is through Ethernet or Wi-Fi, sharing that connection with other computers is a breeze. This comprehensive guide will assist you in setting up internet sharing on your Mac by following a detailed step-by-step procedure.
Access Internet Sharing Settings
To get started, follow these simple steps:
Access the Apple menu on your Macintosh.
Press the “System Preferences” option Afterward, pick “General” from the sidebar.
Proceed by clicking on “Sharing” which can be found on the right side of the window. Finding it might require you to scroll down.
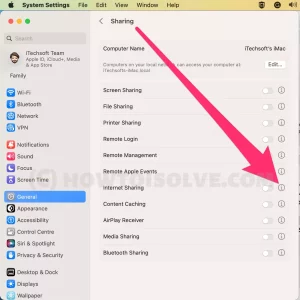
Image by:https://www.howtoisolve.com/
Choose the Internet Connection to Share
Click the information (“Info”) button next to “Internet Sharing.”
In the “Share your connection from” pop-up menu, select the internet connection that you want to share. For instance, if you’re currently connected via Ethernet, choose “Ethernet” from the list.
Configure Internet Sharing for Wi-Fi (Optional)
If you want to share your internet connection over Wi-Fi, follow these additional steps:
In the “To computers using” list, select “Wi-Fi.”
Click on “Wi-Fi Options” to configure your internet-sharing network.
Network Name: Enter a name for your shared connection.
Channel: If using the default channel is not your preference, click the “Channel” pop-up menu and choose a different one.
Security: If available, select an appropriate option from the “Security” pop-up menu.
Choose “WPA3 Personal” if all computers using the shared connection support WPA3.
Choose “WPA2/WPA3 Personal” if some computers support only WPA2.
Password: Enter a password for your shared connection. You can also check the “Show password” checkbox to view the current password.
Click “OK” for preserving your Wi-Fi preferences.
Enable Internet Sharing
After choosing the suitable internet connection and possibly adjusting Wi-Fi settings, Proceed to turn on internet sharing.
To switch it on, mark the box adjacent to “Internet Sharing”.
There will be an alert that shows up, informing you of the possible drawbacks of sharing your internet connection. Part 2: When both your internet and local network utilize a shared port, such as Ethernet. Place great importance on this warning and investigate further if necessary.
In case of complete certainty, press the button labeled “Start.” To opt out, simply select the option marked as “Cancel.”

Image by:https://www.idownloadblog.com/
Important Warning and Precautions
Before enabling internet sharing, having a thorough understanding of the potential hazards is critical. Especially if your internet connection and local network use the same port. For example, sharing your internet connection via Ethernet could disrupt the network, thus possibly causing inconvenience for other ISP customers. Your ISP might even terminate your service.
Exercise caution and, if needed, consult with your network administrator or ISP before proceeding with internet sharing.
By implementing these recommended actions, you can conveniently distribute your internet connection from your Mac among other devices connected within your local network. Whether you opt for Ethernet or Wi-Fi when sharing, The method is uncomplicated and can be an advantageous resource in various scenarios.


Leave a Comment
Your email address will not be published. Required fields are marked with *