
Introduction to AirDrop: Seamlessly Share Files on Mac AirDrop allows for seamless file transfer between Apple devices without much hassle. AirDrop on your Mac enables you to efficiently share content with nearby iPhones, iPads, and other Apple devices without cables. The steps involved in using AirDrop on a Mac will be presented in this guide
Introduction to AirDrop: Seamlessly Share Files on Mac
AirDrop allows for seamless file transfer between Apple devices without much hassle. AirDrop on your Mac enables you to efficiently share content with nearby iPhones, iPads, and other Apple devices without cables. The steps involved in using AirDrop on a Mac will be presented in this guide for seamless file sharing.
Exchanging Data via AirDrop on Mac
Using AirDrop enables you to transmit documents from diverse sources such as the Finder, desktop, or through applications like Safari or Maps. Follow these simple steps to send items using AirDrop:
As an alternative, open the Finder sidebar, locate “AirDrop,” and drag the desired item directly to the targeted device.
In order to use AirDrop, locate the Share button inside the app and choose it next to selecting the desired device.

Image by:https://support.apple.com/
Sending Documents using AirDrop on Mac
Users can opt to receive or decline a file transmission from a fellow Mac user through AirDrop. When using the same Apple ID on two devices that are synced through iCloud, transferred items are instantly recognized and stored without manual intervention. To receive and save items sent via AirDrop:
From the AirDrop notification on your Mac, choose the “Accept” menu, followed by selecting your preferred choice.
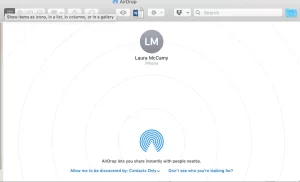
Image by:https://www.businessinsider.com/
Check the Downloads folder or the appropriate app to locate the received item.
Permit Others to Transfer Documents to Your Mac via AirDrop
To enable others to send files to your Mac via AirDrop, follow these steps:
The Finder icon situated in the Dock should be clicked to initiate a Finder instance.
Access “AirDrop” via the Finder interface.
In the AirDrop window, click the “Allow me to be discovered by.” The pop-up menu offers two options – Contacts Only or Everyone. Choose your preferred selection.
Managing AirDrop with Control Centre
Control Centre offers a convenient means of switching AirDrop functionality on or off. Additionally, you may selectively manage who can send content to your Mac through AirDrop. Here’s how to use Control Centre to manage AirDrop:
Locate the Control Centre in the menu bar and click it.
Access the AirDrop settings by tapping the icon.
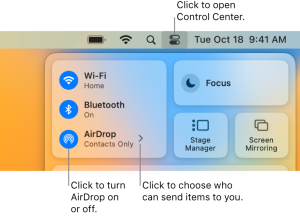
Image by:https://support.apple.com/
Upon clicking the AirDrop arrow, choose between the two choices shown to decide who can transfer material to you.
Conclusion:
Your Mac can easily share documents with neighboring Apple products via AirDrop. With the aid of this guide, transferring files and photos via AirDrop will be a straightforward process. Experience seamless wireless document transfers and amplify your productivity on your Mac.


Leave a Comment
Your email address will not be published. Required fields are marked with *