

Introduction to macOS Command-Line Disk Management Mac users are often familiar with Disk Utility, a graphical tool for disk management tasks. However, macOS offers powerful command-line tools for disk management that provide advanced flexibility and control. In this guide, we will explore the functionalities of macOS command-line tools for disk management and learn how to
Introduction to macOS Command-Line Disk Management
Mac users are often familiar with Disk Utility, a graphical tool for disk management tasks. However, macOS offers powerful command-line tools for disk management that provide advanced flexibility and control. In this guide, we will explore the functionalities of macOS command-line tools for disk management and learn how to perform tasks efficiently from the Terminal.
Understanding Disk Information with diskutil
The diskutil command is the gateway to a wide range of disk management features. It allows users to view essential information about disks and volumes, making it easier to identify and manage storage devices. To access this information, open the Terminal and enter the command “diskutil list.” This will display basic information about all available volumes and attached drives, including hidden partitions such as EFI.
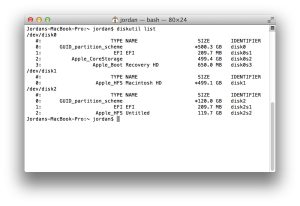
Image by:http://www.theinstructional.com/
Verifying and Repairing Volumes from the Command-Line
Similar to Disk Utility, diskutil provides options to verify and repair volumes for errors. Using the “verifyVolume” and “repairVolume” commands, users can check the health of volumes and fix any issues that may arise. These options are useful for maintaining the integrity of storage devices and ensuring data reliability.
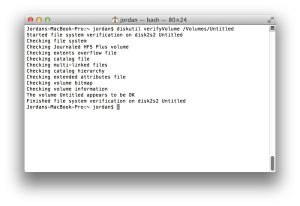
Image by:http://www.theinstructional.com/
diskutil verifyPermissions /Volumes/{volume name} diskutil repair Permissions /Volumes/{volume name}
Erasing Disks and Volumes Safely and Efficiently
Erasing disks or volumes is a critical task that requires caution. The command-line allows users to erase an entire disk or specific volumes without the need for graphical interfaces. Using the “eraseDisk” command, users can wipe a whole disk clean, removing any existing partitions and creating a new one with the desired filesystem. For erasing individual volumes, the “eraseVolume” command provides a simple way to clear content while retaining the existing filesystem and name.
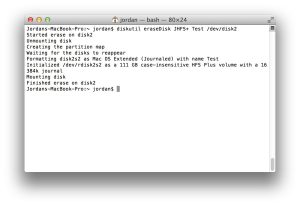
Image by:http://www.theinstructional.com/
Managing Partitioning and Modifying Volumes with Command-Line Tools
For more experienced users, the command-line offers advanced partitioning and volume modification capabilities. With the right commands, users can create, resize, and delete partitions, allowing for optimal disk organization and storage allocation. Additionally, the “reformat” option allows users to erase volume contents while keeping the existing filesystem and name intact.

Image by:http://www.theinstructional.com/
Renaming Volumes with Ease
Renaming volumes from the Terminal requires a specific command structure. Unlike renaming files or folders in the Finder, the command-line approach involves using the “diskutil rename” command. By specifying the current name of the volume and the desired new name, users can quickly and efficiently rename their volumes.
Wrapping Up
Command-line disk management tools in macOS offer a wealth of possibilities for experienced users. While the graphical interface of Disk Utility is user-friendly, command-line tools provide a more streamlined approach for tasks that would otherwise involve multiple steps. By mastering macOS command-line tools for disk management, users can efficiently verify, repair, erase, and modify disks and volumes, taking full control of their storage needs.


Leave a Comment
Your email address will not be published. Required fields are marked with *