

Introduction If you count on the integrated camera of your Mac for activities such as video conferencing, snapping pictures, or completing various tasks, the situation can become exasperating if it abruptly stops functioning or refuses to activate within specific applications. The hindrance caused by this can have a significant impact on your productivity and effective
Introduction
If you count on the integrated camera of your Mac for activities such as video conferencing, snapping pictures, or completing various tasks, the situation can become exasperating if it abruptly stops functioning or refuses to activate within specific applications. The hindrance caused by this can have a significant impact on your productivity and effective communication. That being said, prior to entering panic mode, several troubleshooting actions are available for you to try and fix the problem. In this instructional document, we are here to help you resolve the issue with your Mac’s camera by providing detailed solutions.
Update Your Software
Among the top priorities, it is crucial to examine if your macOS has been updated. Bug fixes and improvements are often included in the software updates released by Apple, This can help tackle any issues specifically related to the camera.
To check for software updates:
Choose the Apple menu () situated within the corner on the top left side your monitor.
Select “System Preferences,” then click on “Software Update.”
Click “Update Now” to install any available updates.
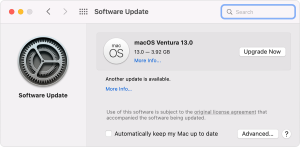
Image by:https://support.apple.com/
Check Screen Time Settings
In case you are utilizing macOS Catalina or any subsequent versions and have activated the Screen Time feature, checking if your camera is properly functioning is vital. Access to it should also be extended to apps.
To check Screen Time settings for the camera:
Press the Apple menu () and go for “System Preferences.”
Select “Screen Time” and then click on “Content & Privacy.”
Click on “App Restrictions” (or “Apps”), and ensure that the checkbox for “Camera” is selected.
If you have set up App Limits, Check the list of applications and ensure that essential apps have camera permission granted.
Give Apps Permission
From macOS Mojave onwards, you can determine which applications are allowed to use your Mac’s integrated camera. Should the camera cease to work in a specific application, granting it permission manually could be required.
To grant camera permission to apps:
Access the Apple menu () and opt for “System Preferences.”
Access the menu titled as “Security & Privacy,” Next, opt for either “Privacy” or “Privacy & Security.”
In the sidebar’s left section, choose “Camera.”
Make sure the apps you want to use with the camera have the checkbox next to them selected. If not, simply check the box to grant its access for those apps.
Some apps may require you to quit and reopen them so that the adjustments can be applied.
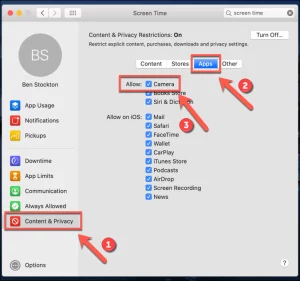
Image by:https://www.switchingtomac.com/
Reboot your Mac or Reset the SMC
At times, powering off and on again can solve issues with the camera. If you have a Mac with Apple silicon (M1 chip), give your computer a restart and verify if the camera begins functioning once more. To resolve these problems on Intel-based Macs, attempt resetting the System Management Controller (SMC).
To reset the SMC on Intel-based Macs:
Shut down your Mac.
Maintain pressure on the power button for no less than 10 seconds. for at least 10 seconds.
Let go of the power button, Next, pause for a few moments.

Image by:https://iboysoft.com/
Check the Camera Indicator Light
Certain Mac notebooks have, situated next to the built-in camera. Assuming the camera gets activated, this light will flash green. Should there be no response or if the behavior exhibits differences, it could indicate a hardware issue.
When the camera indicator is malfunctioning, contacting Apple Support is highly recommended for further assistance.

Image by:https://support.apple.com/
By carrying out these prescribed steps for resolving issues, you can commonly fix any difficulties concerning your Mac’s internal camera. Afterward, resume utilizing it for any of your video and photography necessities. If the dilemma lingers, ponder reaching out to Apple Support or paying a visit to an authorized service center for deeper assistance.


Leave a Comment
Your email address will not be published. Required fields are marked with *