

Introduction The winged eyeliner look never goes out of style and makes any makeup style more glamorous. If getting the perfect wing has been challenging for you, don’t stress! Follow these simple instructions to master the art of creating a flawless winged eyeliner. From creating the wing to connecting it seamlessly, you’ll master the art
Introduction
The winged eyeliner look never goes out of style and makes any makeup style more glamorous. If getting the perfect wing has been challenging for you, don’t stress! Follow these simple instructions to master the art of creating a flawless winged eyeliner. From creating the wing to connecting it seamlessly, you’ll master the art of winged eyeliner and achieve a stunning look every time.
Prepare Your Eyelid
Start with a clean and primed eyelid. Remove any excess oil or makeup residue to ensure a smooth canvas for your eyeliner application.
To help your eyeliner stay on and look good all day, apply a small amount of eyeshadow primer or concealer beforehand.
Create the Wing
Choose your preferred eyeliner type and begin by drawing a diagonal line extending from the outer corner of your eye. Your wing can begin with this as its base.
Angle the line upwards towards the tail of your eyebrow, creating the desired wing length. Alter the angle and length based on your personal choice.
To make things balanced, put a piece of tape in the shape you want. Glide the eyeliner along the tape’s edge and remove it after creating the wing.
Outline the Upper Lash Line
Start by going towards the inside part of your eye and then draw a thin line above your lashes. As you go towards outside, make it thicker step by step.
Ensure that the line tapers to meet the wing at the outer corner. Say goodbye to any visible lines between the wing and the remaining part of your eyeliner.
Connect the Wing
Use a small brush to draw a skinny line from the edge of your wing towards the middle of your eyelid, tracing along the curve of your lashes. Maintain precision to achieve a flowing and cohesive line.
Ensure that the wing connects seamlessly with the lash line to create a neat and polished appearance.
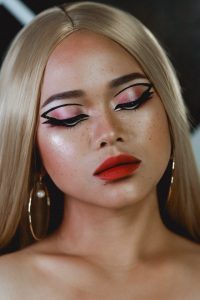
Photo by Vince Mariel Conlu: https://www.pexels.com/photo/blonde-woman-with-red-lipstick-11816308/
Perfect the Shape
Check for symmetry by comparing both eyes. Confirm that both wings are evenly balanced and aligned correctly.
To correct any uneven or messy areas, dab a cotton swab soaked in makeup remover on them. This action will result in sharper lines and a more refined wing shape.
Finishing Touches
If desired, apply mascara to your lashes to enhance the overall look and add volume and length.
For a bolder effect, you can further intensify the wing by adding a second layer of eyeliner or extending the wing length.
Practice and Experiment
Remember, achieving the perfect winged eyeliner takes practice. It’s okay if your initial efforts are not without flaws. Stick with it and don’t stop practicing. As the days pass, you’ll gain more certainty in yourself and improve your abilities.
Try out different eyeliner styles, wing shapes, and colors to discover the one that fits you perfectly. You can be really imaginative with winged eyeliner because it’s so versatile!
Conclusion
This tutorial will teach you everything you need to know about achieving a flawless winged eyeliner application. Complete these actions, practice consistently, and have no fear in trying different approaches. Soon enough, you’ll be able to confidently apply a flawless winged eyeliner look with precision. Get ready with your eyeliner and savor each moment as you work towards achieving the ideal winged eyeliner result. Get ready to elevate your makeup game and turn heads with your stunning winged look!


Leave a Comment
Your email address will not be published. Required fields are marked with *