
Introduction Backing up your data is crucial to ensure the safety of your files, photos, and important documents. macOS Ventura offers a convenient backup solution called Time Machine, which can be configured to work with external disks. In this guide, we’ll walk you through the process of setting up Time Machine with an external drive
Introduction
Backing up your data is crucial to ensure the safety of your files, photos, and important documents. macOS Ventura offers a convenient backup solution called Time Machine, which can be configured to work with external disks. In this guide, we’ll walk you through the process of setting up Time Machine with an external drive and performing manual as well as automatic backups.
Connecting the External Drive
Before getting started, ensure you have an external drive that you want to use for Time Machine backups. Connect the drive to your macOS Ventura system using the appropriate cable. Once connected, follow these steps:
Image by:https://support.apple.com/
Click on the Apple icon in the top-left corner of your screen.
Choose “System Preferences” from the drop-down menu.
In the System Preferences window, click on “Time Machine.”
Click on the “Select Backup Disk” button.
From the list of available disks, choose your external drive.
Click on “Use Disk” to set the selected external drive as your Time Machine backup disk.
Configuring Time Machine
Now that your external drive is set as the Time Machine backup disk, let’s configure Time Machine settings:
To access Time Machine quickly, click on the Time Machine icon in the menu bar and select “Open Time Machine Preferences.”
Alternatively, you can access Time Machine through System Preferences > Time Machine.
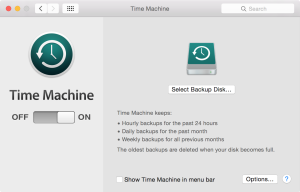
Image by:https://www.idownloadblog.com/
Manually Backing Up with Time Machine
With Time Machine configured and the backup disk set up, you can manually back up your data:
Click on the Time Machine icon in the menu bar.
Select “Back Up Now” to initiate an immediate backup.
Time Machine will start backing up your files to the external drive.
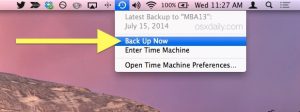
Image by:https://osxdaily.com/
Setting Up Automatic Backups
Enabling automatic backups ensures that your data is continuously protected without the need for manual intervention. Here’s how to set up automatic backups:
In the Time Machine preferences, check the box next to “Back Up Automatically.”
Click on “Options” to set your preferences.
In the Options window, you can choose to exclude certain items from backups to save space on the external drive. For example, you can exclude system files, applications, or specific folders.
Once you’ve selected your preferences, click on “Save” to apply the changes.
Remember the Human Element
While safeguarding your data is essential, it’s also vital to be mindful of the human element in your digital life. Backing up not only protects files but also preserves memories and valuable moments captured in photographs and documents. Take a moment to reflect on the importance of these digital artifacts in your life, and let Time Machine be your guardian in preserving them.
Conclusion
Configuring Time Machine with external disks on macOS Ventura is a straightforward process that offers peace of mind and data protection. By following the steps outlined in this guide, you can ensure that your files are backed up securely and effortlessly. Whether you opt for manual backups or set up automatic ones, Time Machine remains a reliable companion, safeguarding your precious data in the face of unforeseen events.
Remember, accidents happen, hard drives can fail, and data may get lost—but with Time Machine, you’re taking a proactive step towards securing your digital world. So, connect that external drive, set up Time Machine, and let it handle the task of safeguarding your valuable data with ease.


Leave a Comment
Your email address will not be published. Required fields are marked with *