
Introduction: Create an Email Alias on Skiff Mail Email aliases are a powerful tool for managing your inbox effectively. In this guide, we’ll walk you through the process of creating an email alias on Skiff Mail, a feature that can significantly improve your email organization and privacy. Whether you’re using the web version or the
Introduction: Create an Email Alias on Skiff Mail
Email aliases are a powerful tool for managing your inbox effectively. In this guide, we’ll walk you through the process of creating an email alias on Skiff Mail, a feature that can significantly improve your email organization and privacy. Whether you’re using the web version or the desktop app, setting up an email alias is a breeze.
What Is an Email Alias?
An email alias is essentially a secondary email address associated with your main Skiff Mail account. The beauty of email aliases lies in their ability to streamline your communication. All emails sent to your aliases end up in a single inbox, making it a convenient way to manage multiple purposes or identities under one account. This functionality not only simplifies your inbox but also eliminates the hassle of juggling multiple logins. Moreover, if you want to communicate without revealing your primary email, aliases become an indispensable tool for safeguarding your online privacy.
How to Create a Skiff Email Alias
Creating an email alias on Skiff Mail is a straightforward process that can be completed in a few easy steps:
- Log into your Skiff Mail account: Start by logging into your account using your preferred browser.
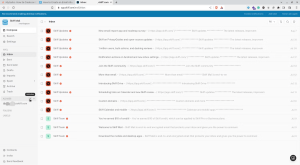
- Access Aliases in the Skiff dashboard panel: Once logged in, locate the “Aliases” section in the Skiff dashboard panel.
- Add a new email alias: Click on the “+” icon to initiate the process of adding a new email alias.

Image by https://www.makeuseof.com/
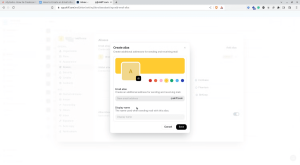
- Provide necessary details: Enter the desired email address in the “New email address” field, along with a display name in the corresponding field. You can even personalize your alias further by adding a profile picture through the camera icon.

Image by https://www.makeuseof.com/
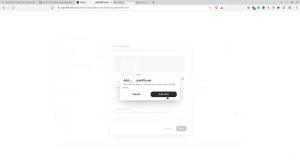
- Save your changes: After inputting the required information, click “Save” and then “Add Alias” to create your new email address.

Image by https://www.makeuseof.com/
- Start using your alias: With the new alias successfully created, you can now send and receive emails using it.
How to Delete Skiff Email Aliases Should the need arise, you can easily delete an email alias by following these simple steps:
- Log into your Skiff account: Begin by logging into your Skiff account.
- Navigate to Settings: Within your account, locate and click on “Settings.”
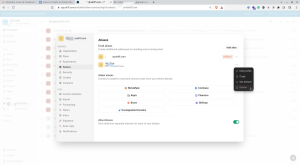
- Access Aliases: Once in the Settings panel, find and select the “Aliases” option.
Image by https://www.makeuseof.com/
- Select the alias to delete: Identify the email alias you want to remove and click on the three-dot icon next to it.
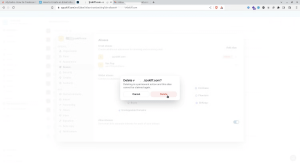
- Confirm deletion: Click “Delete” from the options presented. A confirmation message will appear.
Image by https://www.makeuseof.com/
- Finalize the deletion: Confirm your intention to delete the alias by clicking “Delete” on the popup message.
Protect Your Privacy With Email Aliases
Utilizing email aliases offers a dual benefit: it enhances your privacy and keeps your inbox organized. By assigning different aliases for specific purposes, you can compartmentalize your communication effectively. Even on Skiff Mail’s free plan, you can create multiple aliases, taking full advantage of this feature to optimize your emailing experience. If safeguarding your email security is a top priority, consider exploring encrypted email services for an extra layer of protection.
Conclusion,
Email aliases on Skiff Mail are a game-changer for anyone seeking to manage their inbox efficiently while maintaining privacy. Whether you’re new to the concept or an experienced user, creating and managing aliases is a skill that’s worth mastering.


Leave a Comment
Your email address will not be published. Required fields are marked with *