

Introduction to Windows Backup with the option to Recover In Windows 11 and Windows 10, a trustworthy backup and restore system is necessary for safeguarding your valuable files and data. No matter if you are on Windows 11 or Windows 10, You have the choice of two main methods for backing up and recovering
Introduction to Windows Backup with the option to Recover
In Windows 11 and Windows 10, a trustworthy backup and restore system is necessary for safeguarding your valuable files and data. No matter if you are on Windows 11 or Windows 10, You have the choice of two main methods for backing up and recovering your files These methods are File History and Backup and Restore.
Restoring Files with File History
An efficient built-in feature called File History providing the ability to backup your files onto either an external storage device or a network location. To restore files using File History, follow these steps:
Connect the external storage device containing your backup files.
Type “Control Panel” in the search box on the taskbar Choose it from the displayed results.
In Control Panel, search for “File History” Opt for “Save backup copies of your files by using File History.”
Comply with the guidance provided on your screen for recovering your files to their earlier condition.
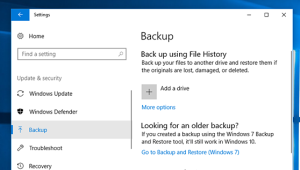
Image by https://support.microsoft.com/
Restoring Files with Backup and Restore
Windows 10 obtained Backup and Restore as an additional backup method from its predecessor, Windows 7. In case you have utilized this technique for backing up your data or generating system image backups in earlier Windows versions, accessing your older backups within the confines of the Windows 10 operating system remains feasible. To restore files using Backup and Restore, follow these steps:
Establish a connection with the external storage device containing your backup files.
Type “Control Panel” in the search box on the taskbar Afterwards, choose it.
Select “To access ‘Backup and Restore (Windows 7),’ select the following option..”
Pick the backup that you want to restore files from. for restoring your files. Select the location of your external storage device, Next, carefully obey each instruction given in order to fully complete the restoration process.
Recovering Windows Files and Settings
Besides restoring individual files, The option to automatically restore your system settings and Microsoft Store apps is available in Windows 11 as well. In case you’ve synchronized settings from either a Windows 10 or Windows 11 device by utilizing your Microsoft account. The restoration of these settings is guaranteed When you log into your new computer In addition, you have the option to recover your Microsoft Store applications including your OneDrive directories For additional details on syncing settings, consult the ‘About Windows backup and sync settings’ guide
Using File History to back up your PC. For a smooth backup process, one method of backing up your files is by utilizing File History to an outside storage device or a network location. Follow these steps to set up File History:
Select “Start,” then go to “Settings” > “Update & Security” > “Backup.”
Click “Add a drive” and decide between utilizing an external hard disk/drive or connecting to a shared network folder as the destination for storing your backup files.
Restoring Your Files using the File History Feature
If you find yourself missing an important file or folder that you previously backed up, you can quickly restore it using File History:
Type “Restore files” in the search box inside the search bar present on the taskbar and opt for “File History” and click on “Retrieve your lost data.”
Look for the specific file you need and utilize the arrow buttons to observe its various editions.
After locating the desired version, choose “Restore” to preserve it in its initial position. Another possibility is to right-click on “Restore,” select “Restore to,” and choose a new location to save the file.
Locate backups from earlier versions of Windows from Previous Windows Versions
For those who have utilized Backup and Restore for creating backups in previous iterations of Windows, It is still possible to access those outdated backups on Windows 10. To find your old backups:
Type “Control Panel” in the search box in the taskbar area and choose it..
Go to “System and Security” > “Backup and Restore (Windows 7).”
In conclusion,
It is essential to comprehend the backup and restore choices provided in both Windows 11 and Windows 10 to protect your valuable files. In the event of data loss or system issues, this guarantees that you can retrieve them. Deciding on either File History or Backup and Restore guarantees that your data is protected with constant backup, Making use of these incorporated capabilities brings tranquility when it comes to safeguarding your precious data.


Leave a Comment
Your email address will not be published. Required fields are marked with *